Woodless Coloring Pencils
- Jennifer Leonard

- May 9, 2022
- 2 min read
In March, I took Altenew's Craft Your Life Virtual Retreat: Fabulous Florals. 12 hours of crafty fun with skilled instructors teaching us the basics and more advanced ways of using Altenew's Woodless Coloring Pencils. Being in Level 3 means I get to choose my class and work on an area I would like more practice in! Woodless Coloring is a new skill for me and a great class as I end my level 3 classes. I learned so much during the Craft Your Life Retreat. Woodless Color Pencils create beautiful blends and shades of color. The pigment is so creamy, and depending on your pressure when coloring, can create light shades and darker shades. As you add numerous layers, the pigment sits on top of each other creating fabulous masterpieces of color. The set of 36 pencils come with a handy layering guide to help those new at this skill. I have much to learn, but have a good foundation! I am beyond excited to share this post with you all! Here is my first card:
To make this card, you will need the following supplies:
Extra Special Stamp Set and matching die
Woodless Coloring Pencils
Halftone Circles Nesting Die
Rows of Squares 3D Embossing Folder
Molded Lines Stencil
Coral Bliss Dye Ink
Obsidean Ink
Black Enamel Dots (non Altenew)
blending brushes
your choice of adheshives
Take any patterned paper you like and emboss with the Rows of Squares Folder. Cut down to 4 x 5 1/4 and adhere to an A2 Card Panel. Stamp the floral image with Obsidean Ink and create your flowers using Ruby Red, Coral Bliss and Peach Perfect. See attached You Tube Video for more guidance. Die Cut the flower.
Using the halftone circle nesting die set, use the largest circle and using a blender brush, gently blend on coral bliss to cover circle. Then take the molded lines stencil, place over the circle die cut, and blend a second layer of coral bliss. This will give you the colored lines. Adhere the circle and floral to your card, add the sentiment and enamel dots! Your card is complete!
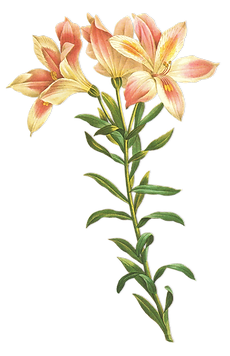
Here is another card I made using the Forever in Love Stamp Set.
I stamped the image in Obsidean Ink and used the following pencils to color in the flower.
Heartbeat
Crimson
Shadow Creek
Mangrove Root
Sapphire
I then fussy cut the floral image and set aside. On an A2 Watercolor panel, I did a light wash of a blend of green inks from the 36 color water color pan set. To be honest, I had leftover greens on my palette and this is what was used. But my best guess is a blend of frayed leaf, and a bit of forest glades with citrus burst.
Once my water panel dried, I stamped my sentiment in obsidean ink, added some black splatters using the black ink from Altenew's 12 color pan set, and adhered my flower.
I then popped the panel using foam adhesive onto an A2 sized black panel and adhered to my card.
I have had a blast taking all of my Level 3 Classes! I will continue to learn and perfect all the amazing skills I learned during my time in AECP! Till next time! Hugs!
That wasn't the only interesting pair link Foffi brought with him, nor the only one with aviation ties. For a long time the Universal "A. Cairelli" split-second chronograph ref. 22560 has been a favorite of mine (and I'm definitely not alone). At 44.5mm, like the Aviator's Compax it was wildly out of proportion for its time, but with purpose. link The use of bold link numerals and thick Breguet/pomme hands also makes it stand out from any other Universal you'll see.
Congrats on completing all of the classes and great blog post! I've never used coloured pencils, but I've seen so many beautiful creations made using Altenew's woodless pencils! Good luck with your final workshop!